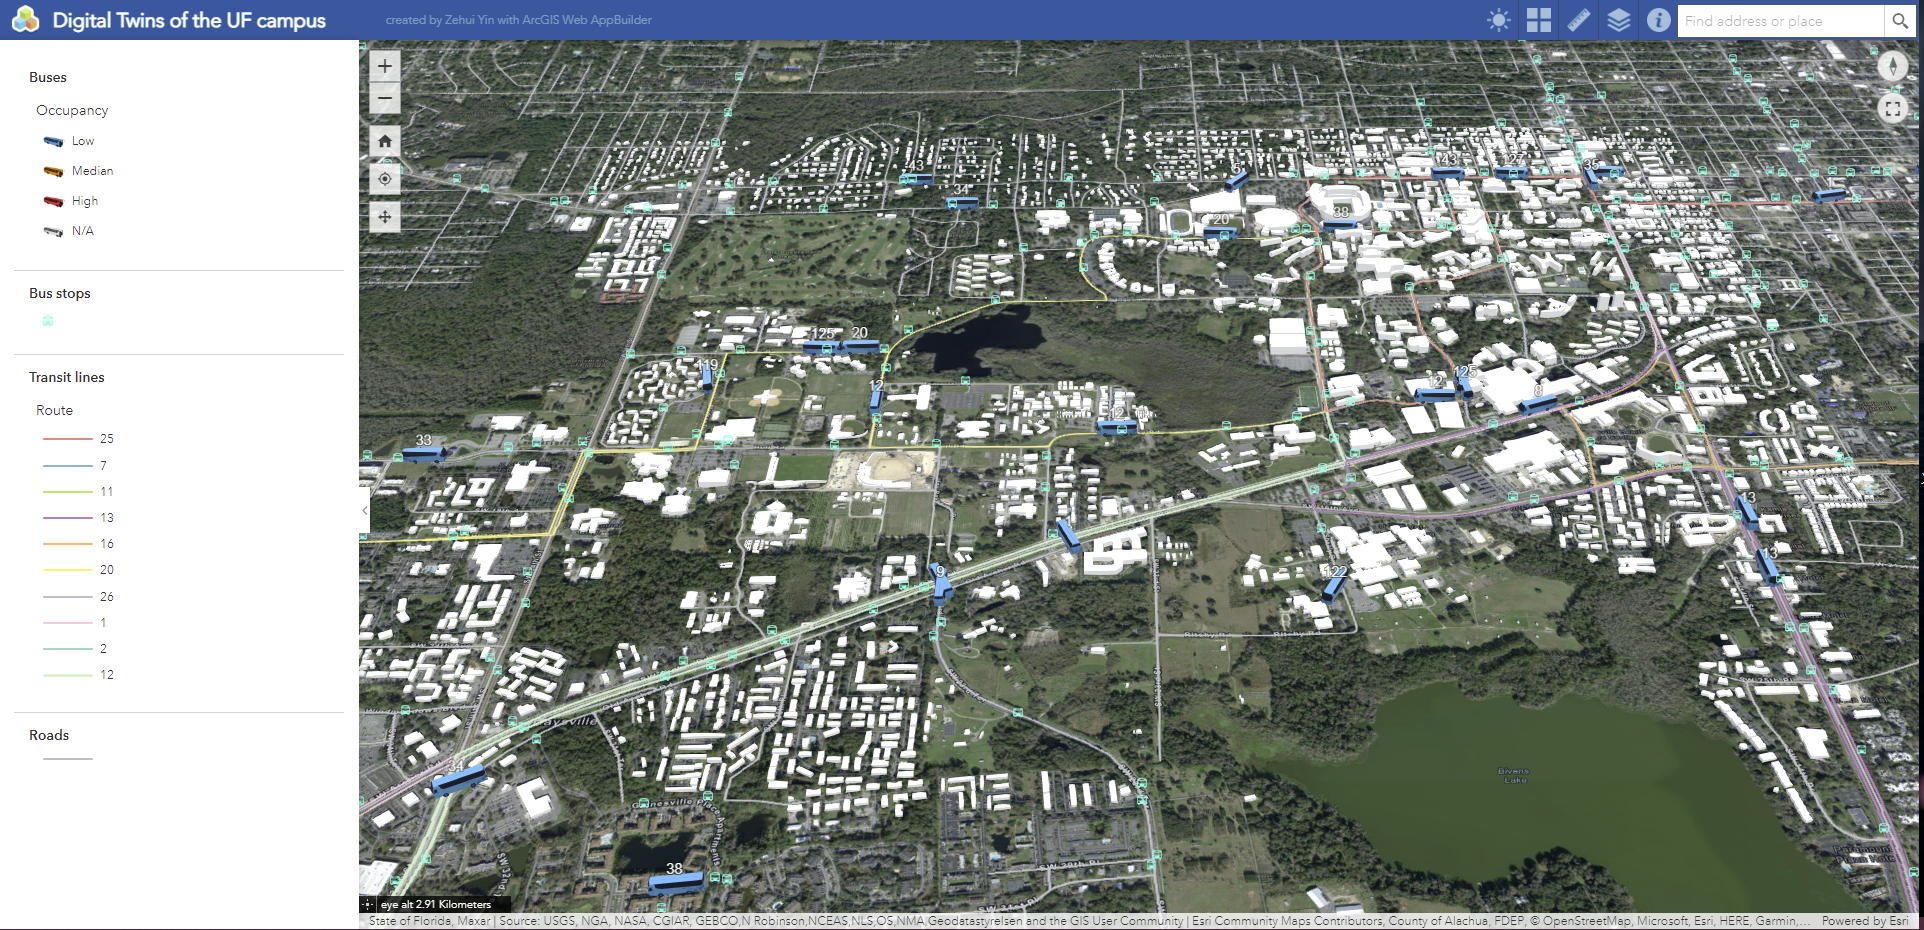
Digital Twin with Real-time Transit Data: UF Campus with RTS
Project summary
This project creates an ArcGIS Online web app with a 3D map which focuses on the UF campus. The 3D map contains the 3D models of the buildings on the UF campus, city roads, bus stops and the real-time RTS buses’ locations.
Software requirements
- ArcGIS Pro
- ArcGIS Online
- ArcGIS CityEngine
- (Optional) Python IDE
Data sources
- OpenStreetMap
- City of Gainesville open data
- GNV RideRTS API
Workflow
- Generate 3D building models on the UF campus
In the ArcGIS CityEngine, first, create a new project with a new scene. Then click file > get map data, selecting the UF campus area. After that, align the downloaded 3D building models to the terrains. Finally, export the 3D building models into Esri Scene Layer Package (.slpk).
- Download the JSON file from RTS API and convert it into Geojson
Due to the API limitations, there is no command to return all the vehicles’ locations. To get around this, we need to create a python script to automate the multiple downloads and merge them into one file. In the “download_request_example.py”, I called the API four times to return different routes’ bus locations which together merged into one JSON that contains all the vehicle locations. Please note that each time I called the API, I filtered the JSON response from the API. Only after the proper filter, the JSON file’s structure is recognizable and convertible by the converter python script. Also, I created four artificial vehicle locations at the end of the JSON file which contains all four different occupancy levels of the buses, by doing this the legend in the later web app would always contain the four occupancy levels.
Then we use the cmd to call the converter python script. Firstly, we set the directory to where the converter is located. Then we use the following code:
call "%PROGRAMFILES%\ArcGIS\Pro\bin\Python\Scripts\propy" Json2GeoJSON.py <json file location>
After the first run, the converter python script would create an ini file alongside the JSON file you use as the input. The first conversion would likely be unsuccessful as the configuration in the ini file is just created and not manually corrected based on the input data. After the first conversion, correct the ini file to exactly the same as the gainData.ini.
- Upload the models and layers to ArcGIS Online
Get all the background layers like City of Gainesville roads, transit routes and stops from the city website’s open data portal. Upload all the background layers as well as the slpk file in step 1 and the Geojson file in step 2 to the ArcGIS online. Note: create a hosted feature layer for the Geojson file during the upload, as we will later constantly update it to make a real-time map.
- Create a web scene and further use it to create a web app
In ArcGIS Online, use the feature layers that have been uploaded to firstly create a web scene. Then create a web app using the web scene. Remember in the web scene setting to set the refresh time to the minimum, which will reduce the update interval in the ArcGIS server later.
- Config constant upload bat file in a local computer
Before updating the hosted feature layer that contains the vehicle information, we need to first store the ArcGIS authentication locally. Due to the UF Gatorlink using two-factor authentication to log in, it would be troublesome to simply store the username and password on the computer. The way to get around this is to first use the following python command in the ArcGIS Pro python environment:
gis = arcgis.GIS(url=<organization_arcgis_portal>, username='', password='', profile='learn_user')
This command would store your username and password in the learn_user profile, however, so far it cannot go through the ArcGIS Online portal yet. After this then, before updating the feature layer, call the following command in the ArcGIS Pro python environment while keeping ArcGIS Pro running in the background:
gis = arcgis.GIS("pro", profile='learn_user')
This command would use ArcGIS Pro to authenticate the profile called learn_user. Please note that use the same account you use in ArcGIS Online in ArcGIS Pro.
Then we can update the hosted feature layer that contains all the vehicle locations by the following command in the ArcGIS Pro python environment:
call "%PROGRAMFILES%\ArcGIS\Pro\bin\Python\Scripts\propy" OverwriteFS.py learn_user <ID> <Name> <location of your downloaded json file>
Note the ID and the name correspond to the upper right corner and the lower-left corner respectively.
Finally, we can use the windows task scheduler to run the bat file every minute to automatically update the hosted feature layer. Or we can use the Invisible_mode_exxec.vbs to hiddenly execute the bat file. Please note that if you want to schedule a task to run the vbs, you need to use the following setting:
Action: Start a program
Program/script: C:\Windows\System32\wscript.exe
Add arguments (optional): C:\Scripts\script.vbs
Helpful reminder
How to run python code in ArcGIS Pro python environment outside of ArcGIS Pro software?
- Use the python command prompt
- Use cmd while using the following command before every python code
call %PROGRAMFILES%\ArcGIS\Pro\bin\Python\Scripts\propy
Example or complementary codes or files included
Please note that all the example codes are not working at their original state as some parameters are left blank in them.
Auth_arcgis_locally.py: Python scripts introduced in step 5 to store authentication locally.Auto_update_example.bat: Bat file used at the end to automatically run multiple python files to update the hosted feature layer.DeveloperAPIGuides3_0.pdf: API manual provided by the GNV RTS API. Please note that the commercial web link that can access the API is: “riderts.app”.Download_request_example.py: Python script to download all the bus locations with four artificial buses of four different occupancy levels and convert it into Geojson.gainData.ini: configuration file that is used in the converter to help correctly convert the downloaded JSON file into proper Geojson.Invisible_mode_exxec.vbs: VBS file used to executeauto_update_example.batsilently (i.e., without any pop-up windows)OverwriteFS.zip: Multiple python scripts provided by Esri. We only need to use the Json2GeoJSON.py and OverwriteFS.py inside. However, some functions inside are dependent on each other. Please unzip before use, don’t change the folder structure and don’t delete unused files inside.
You can find them through this link.
Reference
- Esri_livefeeds. (2022). Overwrite Hosted Feature Services, v2.1.2. ArcGIS. https://www.arcgis.com/home/item.html?id=d45f80eb53c748e7aa3d938a46b48836
- Gonzalo Espinoza. (2022). Schedule automated near real-time data updates. Learn ArcGIS. https://learn.arcgis.com/en/projects/schedule-automated-near-real-time-data-updates/